


Table of Contents
- What Defines High Quality Engraving?
- Signs of Poor Quality Laser Engraving to Reject
- How to Tell Engraving vs Etching on a Gift
- Laser Engraving vs Mechanical Engraving: Key Differences
- The 5-Point Inspection Checklist for Custom Gifts
- Tactile and Durability Tests You Can Do at Home
- Conclusion: Choose Gifts That Last
- Frequently Asked Questions
Last Updated: September 4, 2026
What Defines High Quality Engraving?
High quality engraving is the precise, permanent removal or displacement of material to create crisp, legible text and detailed imagery that withstands daily wear and the test of time. It is the difference between a gift that feels like a thoughtful heirloom and one that looks like a rushed afterthought. The fundamentals of quality remain consistent across every material and method.

The core markers are sharp edge definition, consistent depth of cut, and a clean surface finish. When you run a fingernail across a well-executed engraving, you should feel a distinct, uniform groove. The contrast between the engraved area and the untouched substrate should be clear, whether that means a bright mark on a dark watch case or a deep, dark burn on a wooden plaque. Precision at the edges, often called edge definition, separates professional work from hobbyist attempts.
Signs of Poor Quality Laser Engraving to Reject
Poor quality laser engraving reveals itself through several predictable defects. The most common signs of poor quality laser engraving include charring around the edges, inconsistent shading, and a washed-out appearance where the laser was applied too quickly or with insufficient power.
Look closely for these specific failure points:
- Charring and burn marks: Dark, smoky discoloration on wood or acrylic indicates improper laser power settings. This is permanent thermal damage, not a design choice.
- Inconsistent depth: Run your finger across the engraving. If the depth varies noticeably across the design, the focal length or engraving speed was not properly calibrated.
- Burrs and raised edges: On metals, look for rough, raised burrs along the cut lines. These suggest the laser or mechanical bit was dull or moving too fast.
- Faded or low-contrast marks: If the engraving appears light gray instead of a crisp, contrasting mark on metal, the laser power was too low, resulting in a surface etch that will wear away quickly.
A common mistake is confusing a deliberate, light surface etch with a deep engraving. If the mark is shallow and lacks tactile depth, it will fade with regular handling.
How to Tell Engraving vs Etching on a Gift
Engraving and etching are often used interchangeably, but they are distinct processes with different durability profiles. Engraving physically cuts into the material to create a recessed design, while etching uses chemicals or a low-power laser to remove only a microscopic surface layer (britannica.com).
The practical test is tactile. Run your fingernail across the design. True engraving creates a groove you can feel; etching feels nearly smooth to the touch. Visually, engraving produces a deeper shadow and stronger contrast, while etching often appears as a lighter, frosted mark.
This distinction matters because depth determines permanence. A deeper engraving will survive years of handling, cleaning, and polishing. An etched surface mark, particularly on jewelry worn daily, will gradually wear down and lose its crispness. When evaluating a personalized gift like a watch, you want confirmation that the mark is engraved, not merely etched, to ensure the sentiment lasts as long as the timepiece.
Laser Engraving vs Mechanical Engraving: Key Differences
The two dominant production methods, laser engraving and mechanical engraving, produce results that differ in look, feel, and longevity. Most online guides focus on the technical specs of the machines, but as a consumer, you rarely get to see the equipment. Instead, you hold the finished piece. Here is how to tell which method was used and what that means for the item's future.
Laser Engraving vaporizes material with a focused beam, leaving a frosted, slightly textured surface. This process excels at rendering fine details, gradients, and photographic images. However, the mark is often shallower than a mechanical cut. On metals, a laser mark can appear dark gray or white, depending on the alloy and settings. While durable for display items, a laser mark on a high-contact surface, like a ring band or a watch clasp, will gradually wear and lose contrast over years of friction.
Mechanical Engraving, also called rotary or diamond-drag engraving, uses a spinning cutting tool to physically displace material. This creates a V-shaped or U-shaped groove that is deeper and has a bright, clean interior. The tactile difference is immediate: run your fingernail across the design. A mechanical engraving will catch your nail with a distinct channel. A laser engraving will feel rough or slightly textured, but without a deep groove.
The Fingernail Test in Practice:
- Mechanical: Your nail drops into a clean, continuous channel. The bottom of the groove feels smooth.
- Laser: Your nail skims over a frosted, slightly abrasive surface. There is no defined channel to catch on.
Visual Cues:
- Mechanical: The cut lines have a bright, metallic sheen at the base. Edges are crisp and slightly raised (a clean burr) that is often polished away.
- Laser: The mark is uniformly frosted or dark. Edges are sharp but not raised. On wood, a laser leaves a charred, dark brown or black mark; a mechanical cutter leaves a clean, light-colored groove.
Durability Trade-offs:
- Mechanical cuts are deeper and survive polishing, cleaning, and daily wear. This is why high-end jewelry and watch case backs are traditionally mechanically engraved. The mark can be refreshed by a jeweler if it ever becomes too shallow.
- Laser marks are more resistant to corrosion on stainless steel because the process can create a passive layer, but the visual contrast is surface-level. Frequent rubbing will eventually lighten the mark.
A Unique Angle: The 'Raised Edge' Check
Mechanical engraving often leaves a microscopic raised burr along the edges of the cut. On a high-quality piece, the finisher will have removed this burr. If you feel a sharp, rough lip on the edge of the letters, the piece was mechanically engraved but not properly finished. This is a sign of rushed workmanship, not a flaw of the method itself. Laser engraving never produces a raised burr, so if you feel one, you know the piece was cut, not burned.
When evaluating a gift, ask the seller which method was used. If they do not know, use the fingernail test and the raised-edge check to make your own determination. For items meant to be worn daily, like a watch or a ring, mechanical engraving is the safer bet for longevity. For decorative pieces or items with intricate artwork, laser engraving offers detail that mechanical cutters cannot match.
The 5-Point Inspection Checklist for Custom Gifts
Before you accept any custom-engraved gift, run it through this standardized quality control checklist. It takes less than two minutes and catches the majority of defects.
- Visual Inspection: Hold the piece under bright, direct light. Tilt it at an angle. The engraved lines should be uniform, free of jagged edges, and consistent in contrast across the entire design.
- Tactile Assessment: Gently run your fingertip across the engraved area. High quality engraving produces a smooth, consistent groove with no rough burrs or sharp, raised edges.
- Text Legibility: Examine the lettering closely. Every character should be crisp and fully formed. Look for broken strokes, filled-in loops, or uneven spacing between letters.
- Edge Definition: Check the boundary where the engraving meets the untouched surface. This line should be clean and sharp, not feathered, chipped, or charred.
- Surface Finish: Inspect the overall piece for unintended marks. Quality engraving should not leave stray burn marks, scratches, or discoloration on the surrounding material.
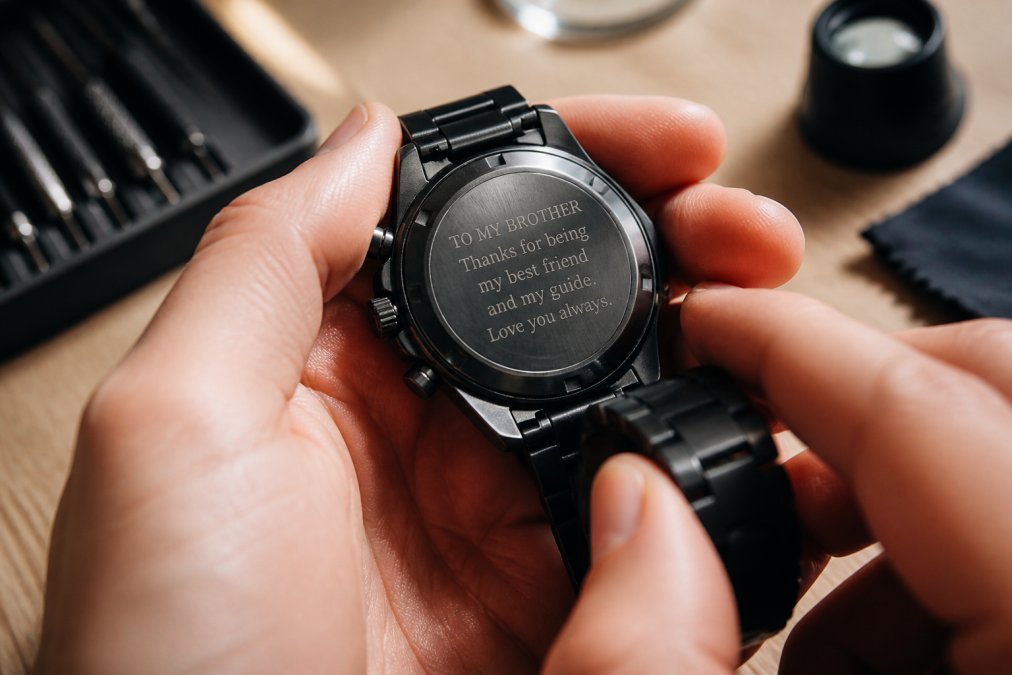
Tactile and Durability Tests You Can Do at Home
Most guides stop at visual inspection. But the true test of an engraving is how it survives real life. You can run a series of simple, non-destructive tests at home to verify the quality and permanence of the mark. These tests take about ten minutes and require no special tools.
Test 1: The Fingernail Drag
Press your fingernail firmly into the engraved groove and drag it across the design. A high quality engraving will catch your nail with a distinct, continuous channel. If your nail skips or the groove feels shallow and inconsistent, the depth is insufficient for long-term wear. This test works on metal, wood, and acrylic.
Test 2: The Cleaning Agent Test
This test simulates years of exposure to everyday cleaning products. Apply a small drop of mild dish soap mixed with water to a soft cloth and rub the engraved area with moderate pressure for 30 seconds. Then, dry it with a clean cloth.
- Pass: The mark looks unchanged. The contrast is the same, and the edges are still crisp.
- Fail: The mark lightens, smudges, or the surface appears scratched. This indicates a surface-level etch or a protective coating that will not survive regular cleaning.
Test 3: The Oxidation Spot Check (for metals)
Engraving exposes fresh metal, which can be prone to oxidation. Wait 24 hours after receiving the piece, then inspect the engraved area under bright light. Look for any dull, gray, or greenish discoloration within the grooves. On stainless steel, a high quality laser engraving may actually improve corrosion resistance (mdpi.com). On brass, copper, or silver, a clear protective lacquer should have been applied after engraving. If you see oxidation forming within a day, the piece was not properly sealed (ganoksin.com).
Test 4: The Tape Pull (for painted or coated surfaces)
If the engraving is on a painted or powder-coated surface (like a colored watch dial or a coated metal plaque), press a piece of clear Scotch tape firmly over the engraved area, then pull it off quickly. A quality engraving will not lift any paint or coating from the edges. If you see paint flecks on the tape, the engraving process cracked the coating, and it will begin to peel within months.
Test 5: The 30-Day Wear Simulation
For items that will face constant friction, like a watch or a ring, you can simulate a month of wear in five minutes. Rub the engraved area with a dry, rough cloth (like a denim scrap) in a circular motion for 60 seconds. This mimics the abrasion of daily contact with clothing and surfaces.
- Pass: The mark is still legible and the contrast is only slightly reduced.
- Fail: The mark has faded significantly or the edges have worn smooth. This indicates a shallow etch that will not last.
These tests are particularly relevant for items like watches, which endure constant wrist movement, sweat, and contact with surfaces. At Lynrix.com, our personalized chronograph watches feature engraved designs on the case back, a placement that benefits from the deep, permanent mark that survives a lifetime of wear. When you receive a custom gift, performing these quick checks gives you confidence that the piece will look as meaningful on the tenth anniversary as it does on day one.
Conclusion: Choose Gifts That Last
Spotting high quality engraving comes down to observing depth, edge crispness, and overall finish, then verifying permanence with simple tactile tests. Reject pieces with charring, burrs, or shallow, washed-out marks, and always confirm you are getting a true engraving rather than a surface etch.
When you are selecting a personalized keepsake, the engraving quality is the difference between a thoughtful gesture and a lasting heirloom. At Lynrix.com, we pair every personalized gift with craftsmanship designed to withstand constant use, ensuring the message you choose remains legible and beautiful for years to come. Whether it is a I Will Love You Until the End of Time - Men's Watch for a milestone anniversary or a A Son's First Hero - Black Chronograph Watch for Father's Day, our engraved timepieces are built to be worn, not shelved. Get started with Lynrix.com and give a gift whose quality matches the sentiment behind it.

Frequently Asked Questions
How can you tell the difference between laser engraving and mechanical engraving?
Laser engraving creates a frosted, matte finish with slightly rounded edges, ideal for intricate fonts and images. Mechanical engraving uses a rotating bit to cut deeper, leaving crisp, sharp edges and a shiny interior. Run your fingernail across the mark: a deep mechanical cut will catch your nail, while a laser mark often feels smooth. For personalized gifts like watches, laser engraving is common because it preserves the metal's integrity while delivering fine detail.
What are the visual signs of high-quality engraving?
High quality engraving features consistent depth across every stroke, clean edges with no burrs or jagged borders, and uniform contrast. The letters should have crisp corners without rounded or melted-looking details. There should be no charring, discoloration, or rough patches surrounding the mark. Look for even spacing between characters and check that the engraving is properly centered on the item. These visual cues indicate careful machine calibration and skilled craftsmanship.
Does engraving depth affect the durability of a custom gift?
Yes, depth directly impacts durability. A shallow engraving may wear away or fade with frequent handling and cleaning. High quality engraving on items like watches should cut deep enough to resist normal wear but not so deep that it weakens the material. As a rule, deeper marks survive polishing and daily contact better. When inspecting a gift, feel the engraving with your fingernail. A noticeable groove indicates a permanent mark built to last.
What are common mistakes to look for in low-quality engraving?
Common mistakes include uneven letter spacing, inconsistent depth across the design, and rough edges that catch on fabric. Look for ghosting or double-strikes where the laser passed twice, creating a shadow effect. Misspelled words and off-center placement are obvious red flags. Poor quality laser engraving often shows burn marks or a yellowed tint around the design on lighter metals. These defects signal rushed production and substandard quality control.
This article was written using GrandRanker


